Installation notes
To use the Cytoflow modules in a Jupyter notebook or your own code
Cytoflow is available as a package for the Anaconda scientific Python distribution. You can install cytoflow through the Anaconda Navigator, or by using the command line.
This is not the only way to get Cytoflow up and running, but it is by far the most straightforward.
Installing from the Anaconda Navigator
Start by installing the Anaconda Python distribution. Make sure to install version 3.6.
Either from the Start Menu (Windows) or the Finder (Mac), run the
Anaconda NavigatorClick the
Channelsbutton.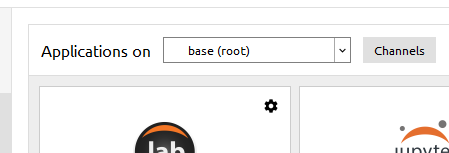
Click
Add...and typebpteague. Select “Update channels.”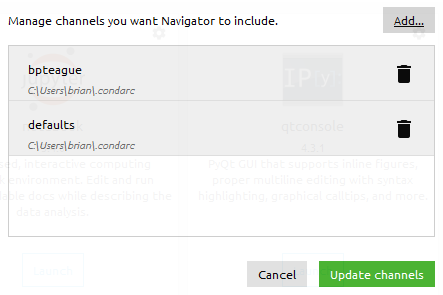
The application
cytoflowshould appear in the launcher. Click theInstallbutton.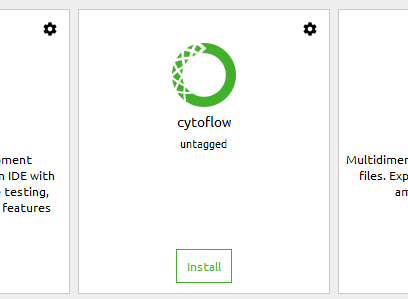
Navigatorasks if you’d like to install in a new environment. SayYes..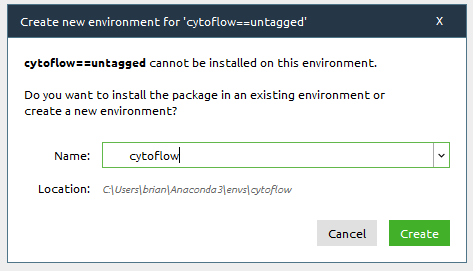
To verify installation, start a Jupyter notebook.
- First, make sure you have the ``cytoflow`` environment selected.
- From the
Anaconda Navigator, install and then launchJupyter notebook. - Create a new Python 3 notebook.
- In the first cell, type
import cytoflowand pressShift+Enter. If Python doesn’t complain, you’re good to go. (If it does, please submit a bug report!)
Note: When you install Cytoflow this way, the point-and-click application is installed as well. Launching it from the
Anaconda Navigatorwill be significantly faster than downloading the pre-packaged binary.
Installing from the command line
Start
Anaconda Promptfrom the Start Menu (Windows) or Finder (Mac).Add the
bpteaguechannel:conda config --add channels bpteague
Create a new environment and install
cytoflowand the Jupyter notebook. In this example, the new environment will be calledcf– feel free to choose a different name:conda create --name cf cytoflow notebook
Activate the new environment:
conda activate cf
Launch the Jupyter notebook:
jupyter notebook
Create a new Python 3 notebook. In the first cell, type
import cytoflowand pressShift+Enter. If Python doesn’t complain, you’re good to go. (If it does, please submit a bug report!)
To hack on the code
Cytoflow depends on a huge number of libraries from the Scientific Python
ecosystem, and a change in any one of their APIs will break the cytoflow
library. So, I have pinned the versions of all of cytoflow’s dependencies,
which all but guarantees that you’ll need to install into a virtual environment.
This will ensure that the rest of your Python installation doesn’t break.
I strongly recommend using Anaconda to install the proper dependencies.
A PyPI package (installable using pip) is also available. The following
instructions assume that you have installed Anaconda (as above) and launched
an Anaconda prompt.
Finally, cytoflow relies on one C++ extension. On Linux, installing the
requirements for building it is straightforward. On MacOS it is harder, and
on Windows it is extremely difficult. Instead, as part of rolling a new
release, the appropriate files are made available on
the GitHub releases page.
The procedure below includes instructions for downloading and installing
the appropriate file.
Install the development dependencies
- On Ubuntu:
apt-get git swig python-dev - On Windows: Install a copy of
git. I use git-for-windows - On MacOS: Install a copy of
gitfrom the Git website.
- On Ubuntu:
If you haven’t, add the
bpteaguechannel to conda:conda config --add channels bpteague
Clone the repository:
git clone https://github.com/bpteague/cytoflow.git
Create a new environment. In this example, I have called it
cf_dev. In the new repository you just cloned, say:conda env create --name cf_dev --file environment.yml
Activate the new environment
On Windows:
conda activate cf_dev
On Mac, Linux or Windows running bash:
source activate cf_dev
On Windows and MacOS only, do the following to prevent
cytoflowfrom trying to build the C++ extension.On Windows:
set NO_LOGICLE=True
On MacOS:
export NO_LOGICLE=True
Install
cytoflowin developer’s mode:python setup.py develop
From the GitHub releases page download the appropriate extension file for the version you’re installing.
- On Windows (32-bit):
_Logicle.cp36-win32.pyd - On Windows (64-bit):
_Logicle.cp36-win_amd64.pyd - On MacOS:
_Logicle.cpython-36m-darwin.so
- On Windows (32-bit):
Copy the file you just download into the cytoflow/utility/logicle_ext/ folder in your source tree.
Test that everything works. Start a
pythoninterpreter and say:import cytoflow
If you don’t get any errors, you’re good to go.
Running the point-and-click GUI program
There are one-click bundles available at http://bpteague.github.io/cytoflow.
Alternately, you can follow the instructions above for installing the
Anaconda package, then run cytoflow through the Anaconda Navigator or
via the command line.